
Tags
bag end, baking, cake, cupcakes, Hobbit, hobbit hole, Lord of the Rings, movie, photography, shire, writer's group
As most people who read at all are aware, the first installment of The Hobbit is coming up this next week and some of us are a little bit excited. As a result, my writer’s group chose to have a LotR marathon (always a terrifying commitment) both in honor of the movie and as a farewell for the two long-time leaders of our group who are moving away. 
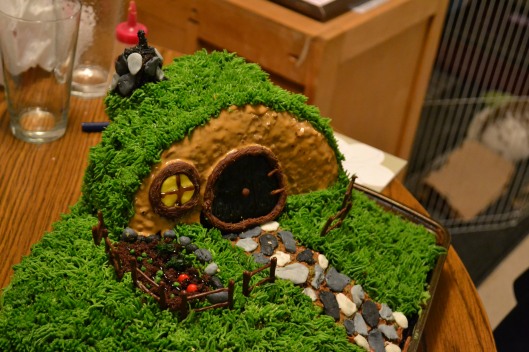
It seemed like the perfect opportunity to bake not just any farewell cake, but a Hobbit-themed farewell cake. I mean, how hard could that possibly be?
Seven hours later, I was intimately acquainted with exactly how hard a Hobbit hole cake was to make, but the results were quite lovely. I should have done a step-by-step photo shoot, I admit, but I was a little preoccupied with piping grass onto a hill. That takes hours, just so you know. Hours.
But, like I said, the results were actually quite satisfying.
 When I build cakes like this (which is a rare occasion), I usually use cake mixes so that if it goes horribly wrong, I haven’t invested quite so much of myself into it. Plus, that cuts a bit of time out of the process which I can use to focus on making the cake pretty.
This cake is made up of three boxes of cake mix (chocolate fudge!). One was used for the large rectangular pan at the base. Another was used for a 9×13 pan to create a hill. The last was divided between a 9 inch circular pan and an 8 inch square pan. I cut the circle in half and glued the halves together to create the hill and used pieces of the square cake to fill in the back and make the chimney.  There are a few obviously tedious elements to this cake. Piping the grass took ages. I used the special “grass tip” for the piping, which worked great, but could only do little bits at a time. It took patience and my hands did not thank me.
The other parts of this cake that you are probably wondering about are the stones (and the door and window). These are made from candy clay, which is an easy homemade molding substance that consists of a bag of Wilton’s white chocolate melting chips and a third of a cup of corn syrup. Melt the chips, mix in the corn syrup, cover the stuff up for three hours or more at room temperature and you have sweet, moldable chocolate! You just add a bit of food coloring and work it in for whatever color you please.

For your information, this stuff is excellent for small things like the rocks and molding around the door, but as soon as it warms up in your hands, it gets very sticky, making it difficult to work with in large amounts (such as that door, which was excruciatingly difficult to make). But it tastes better than fondant and does the trick pretty well. I found that spraying my hands with cooking spray helped keep it from sticking so much.
The fences are made from melted chocolate piped onto parchment paper. They peel right off.
I used a few wooden kabob sticks through the center of the little dwelling to hold it steady, which proved to be a very, very good idea. It didn’t fall apart on the scary journey up the mountain to the writer’s group meeting! Holding that cake in my lap and driving up a steep, bumpy drive was absolutely traumatizing. Appropriately, we arrived in the misty mountains and delivered the cake unharmed. God was very good on that drive.
 But wait! There was more! My roommate Rachel also had a part to play in the cake baking adventure, but she had the enviable task of dealing with cupcakes, which are ever so much more forgiving and easier to transport. And they turned out ridiculously cute as a complement to the cake. For these, she made a spice cake with cream cheese frosting. On some of them, she wrote some pretty Elvish letters:
 Half the cupcakes say “Old memories” and the other half say “New hopes” in honor of the good times we’ve had and what’s ahead for everyone as we move forward, some of us in new directions.
The other cupcakes are absolutely adorable, possibly my favorite cupcakes ever, and super easy to make if you want to do your own Hobbit themed party. They require both regular and miniature cupcakes. The little cupcake simply perches on top as the door. Ridiculous, aren’t they? Different colored doors make the platter of cupcakes look even better. Some piping detail on the door and around the edges add a finishing touch.
 So up to the mountain we went with our precious burden of cake and cupcakes. They were a gratifying hit.
 Oh, and there was, of course, one last cupcake that we added to the plate. A very important cupcake. In fact, it is The Cupcake. The One Cupcake.
You know where I’m going with this.
One Cupcake to Rule Them All.

 Let’s just say that Brian was a bit possessive…


But when you make a cake, you make it understanding that it will have to be eaten eventually. So at long last, the Shire was razed. Or, you know, chopped up and served on plates.
It turned out to be tasty, despite being a cake mix. I’m not sure if I will ever do this again, but it was a worthy one time effort.
My friends and I are attending the midnight showing of The Hobbit. Anyone else excited?

The cake and cup cakes were so cool! Did you ever get “My Precious” from Brian??
Several times, Nancy! He was corrupted shockingly quickly by the power of the One Cupcake.
I am very impressed with your cake, and I would love to recreate something similar for my husband’s upcoming birthday. I especially appreciate that you used traditional cake materials, and didn’t use fondant! Very well done!!
Thanks! I actually hate the taste of fondant, and while I appreciate how creative people are with it, I always find myself missing the natural look of buttercream. I feel like you can make almost any reasonable cake with buttercream, ganache, and some creativity! Good luck with your recreation! 🙂
Pingback: Geek Cake Friday: 21 Hobbit Holes That’ll Make You Hungry | Kitchen Overlord